I took the blue forces and my friend D, who may or may not enter in their own version of the story took the red forces. Both sides represented by board game pieces since, it was too much effort to dig around for anything more suitable at the moment.
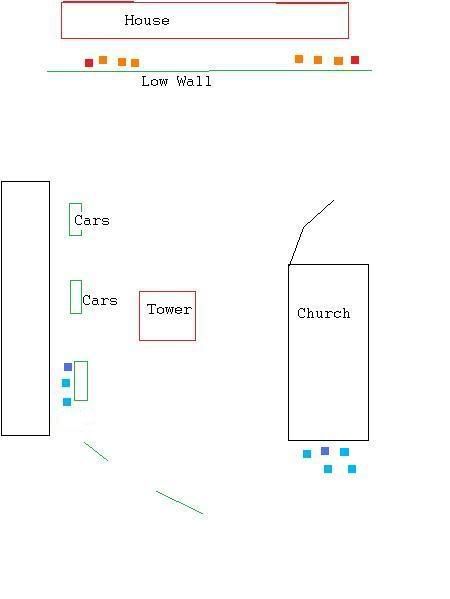
We set up some makeshift terrain, the major features including a Church with a fence on the eastern side of the play area, a low wall along the north, cars and a store on the west, and a town's clock tower in the center.
In hindsight it probably would have been better to play one of the premade scenarios that they give out, instead of jumping right in, but that'll be something for next time. We both rolled up forces for our battle, the setting being rival gang warfare. One of the main lures of the Two Hour Wargame product line is, well, as advertised, all their games should be playable in 2 hours or less. Well we spent a good part of that time looking through the rules and rolling up weapons and characters(they had a nice table for rolling up your force, though for the gang army set under weapons it had "varies")
I winged it on the weapons, and we ended up with each side having a LMG, two Carbines, two Machine Pistols, Two regular pistols, and one BA Pistol(As well as 1 grenade each, though neither of us got a chance to use it). Again, probably should have started less ambitious than 8 characters per side, but that's how it went down. With my forces entering from the south and his from the north

I split my blue forces into two groups, initially I intended the western group under the 2nd in command to occupy the Tower and provide covering fire. Unfortunately I mistakenly put my pistol men with the LMG equipped 2nd in command. So they advanced up to the tower while my main force tried to flank the red forces by going around the east of the Church.
Advancing into position
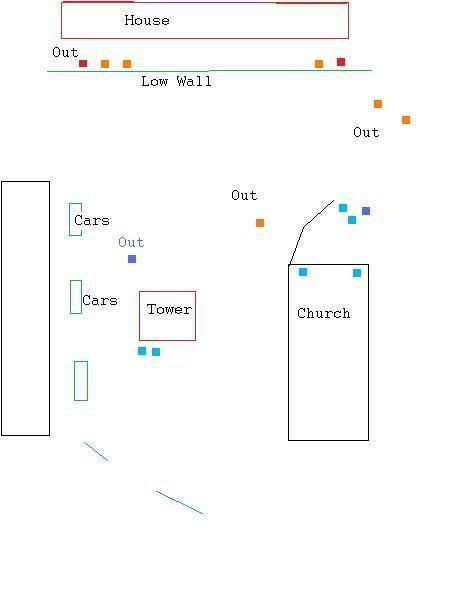
The Red force had little actual movement, as even alone my LMG was successfully forcing most of them to hold their position at the low wall, although they did attempt to send their carbine equipped soldiers to occupy the Tower, they were repulsed, with one falling.(Where it would remain for the rest of the battle, out in the open field beyond hope of rescue). My own fortunes took a turn for the worse as a lucky shot by their leader took out my LMG man, which forces me to abort my flanking maneuver in favor of sending my own carbines up into the church.
The Opening Moves
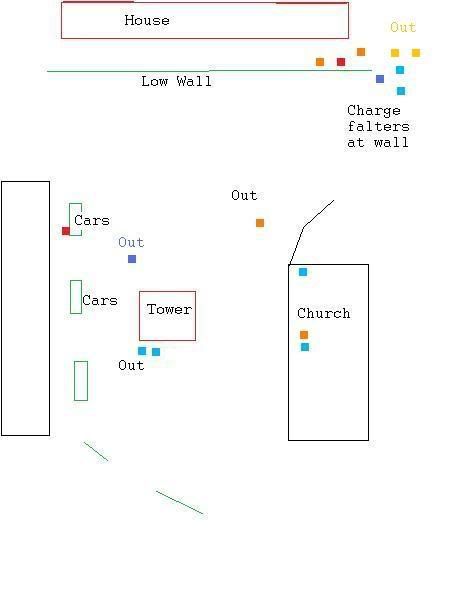
The Red force attempts to take my strongpoint at the church, and is repulsed, some lucky shots by my carbine men keep their LMG equipped soldier from providing much support. They do however sneak a man forward to the cars, where a fierce exchange of pistol fire erupts, and gets nowhere fast(their low impact meant that at best there were a lot of grazing wounds).
Midgame
After Red's disastrous attempt at taking the church I returned the favor, charging at their downed men in the open. No mercy or quarter was given as the Blue forces sliced their throats. Unfortunately both sides got bogged down with the low wall separating them, this is where both leaders bit the dust as we tried out the melee rules. After that they were able to sneak a man into a church, and a brief firefight among the pews erupted, I emerged victorious, with D's man running away in a panic, but it was a pyrric victory. Their LMG leader was back up and my carbine man was having a hard time keeping them from coming forward. On the other hand, near the end I was able to revive my own LMG soldier.
Endgame
We decided to call it a draw, each with only three characters in play, and having lost a leader. All in all it took about 4 hours to get that far, though admittedly it took about an hour of set-up time.
Lessons Learned:
Height is power, in not pressing hard for the church, D had very limited movement options, if not for lucky rolls when I tried to force the wall, they'd have been in a world of hurt, I think it was a double six for my soak roll that left my leader lying in a puddle of blood before he could get the grenade off.
Moving in the open is bad. Both of our assaults stalled due to trying to force the issue moving through the open. And his poor soldier that got taken out in the second or third turn attempting to reach the tower was still lying there by the end of the game.
Don't Go it Alone. The activation system being such that those with a leader, or those with a high rep are more likely to move, splitting up is a bad idea. The western front was surprisingly quiet as turn after turn passed where neither side could move, and when they did a pistol battle would quickly have them ducking back to cover.
Thoughts:
Overall, it was a very fun game, though it had started dragging at the end. The rules were indeed easy to understand, although in practice it was a bit hard to recall everything that applied. Again, I think that if we had played one of the beginner scenarios things might have been better. Since it was free, I can't really give much complaint, though there could have been a table to roll for weapons. The other thing was that it was, well, rather hard to actually kill someone, perhaps it was simply due to the fact that we were using very low impact weapons, but about 80% of the time the character hit would be back on its feet the next turn, or else once someone tended their wounds. The duck back and "in sight" rules really made sure to punish our stupid decisions, some more so than others. It's definitely a game system that I'd like to revisit, even though it didn't live up to the advertising about being only 2 hours.
No comments:
Post a Comment